Showing posts with label project. Show all posts

Friday, December 22, 2017

Doctor Who Chess Set Video

Am I pushing things just a wee bit too far with this thumbnail? Am I relying too much on my ability to make the educational defense should I get into trouble? Was I far too hasty in photoshopping those crowns? Maybe, probably, and yes. But I love it so.

Download and print your own Doctor Who Chess set: https://www.myminifactory.com/object/doctor-who-chess-2018-53282

It's interesting to me what videos I feel good putting the book bumper on the tail end of, and which ones I don't. This one? No conflict. Translating my Grandpa's wood cut nativity set to 3D printing? I'll admit, I waffled a bit before putting it on there, but it seemed to flow. But the Scripture Tree? I just couldn't bring myself to put it on there. And I don't know if it was so much out of solemnity as it just didn't flow with the rest of the video. Maybe that is exactly the solemnity of the project that is influencing me.

Again, this is another project with a lot of little pieces that I've been putting together over a long time. According to the time stamp on the render, I first released TARDIS Run with all the pawns in September 2013. When Capaldi came into the story I updated the set with some premium pawns, to see if there was a market for these things. With this chess set, I guess I'm unofficially de-premium-izing those pawns because you can get them here, plus Jodie Whittaker, Missy, the Empty Child, and the Brain of Morbius. Admittedly Whittaker has a crown, but who's going to want to remove that?

With this sort of project you're always trying to double dip your time so you're not reinventing the wheel with each piece, like setting up frameworks to build on. It just makes sense to keep things consistent. With the Doctors I was generally able to reuse similar techniques from Doctor to Doctor, but with the monsters I was all over the place. One would need solid object manipulation, others would need some sculpting. Of course the putting them all together with Boolean operations afterwards was a nightmare! Of all the pieces, Doctor and monsters, I think Matt Smith's hair cause the biggest problem with the Boolean operator. No matter what I did those locks just did not want to cooperate.

Whenever you pull open an old project like this there's always that moment of "yeech, how dumb was I back then." In this case I had separate source files for each of the Monsters. I also didn't know much about parenting objects back then. So I combined all the source files into one source file and put the individual objects under their respective parent objects to keep the object organizer clean. This was actually a technique I've never used before, but I think I'm going to make it a habit. I wonder what I'll offend myself by not knowing in a few years when Whittaker steps down and I have to update things again.

This leads me to realize that, holy carp, I've been using Blender for a really long time. I don't think there's anything I've stuck with consistantly for longer. And yet I still feel like I'm clumsily banging on a keyboard when I use it. I feel like there's this degree of elegance when using this tool that I am not achieving. Like I'm just barely getting it to do what I want it to. And yet it always does what I want it to in the end. And that's saying something. I've used other tools that I get to a certain point I discover it can't do what I want to do. That is never a problem with blender. It sometimes can'd do things the way I want to do them, the way other programs can, but it always has an answer. That's something.

I gotta dam this stream of consciousness before it floods us all. All I really wanted to say when I started was this; download this chess set on MyMiniFactory, print your own, have a very merry Christmas, and I'll hopefully see you on the other side with a 2017 year-end review before jumping with both feet into the new year and new adventures which will include a band new makerspace.

Oh yeah. Gonna just drop that on you and leave.

Thursday, June 8, 2017

Digital rewards added to Royal Game of Ur Kickstarter.

At the time of this posting the Kickstarter for the Royal game of Ur is achingly close to funding.
I love this paint of the game.
One of the things I should have done at the start of this campaign has been corrected now. A digital reward tier has been added that ads the diamonds and rules that are not available if you download the files online. It's not much, I know, but if you needed just that little extra reason to back the campaign, now you've got it.

And remember, every social media share is a chance to win a copy of the game, whether you're a backer or not.

Saturday, March 11, 2017

My proposal for the TableTop Day 2017 trophy

Dear Wil Wheaton and the team at Tabletop,

My name is Joe Larson. These days I am building my brand as the 3D printing professor, but some years ago presented to you 3D model a trophy for TableTop, the shape of which was defined by Wil Wheaton's striking profile.

I promise, my 3D modeling skills have improved since then.

This year I would like to propose a new trophy for International TableTop Day 2017 on April 29th. This trophy will include elements from across the table top gaming world arranged in a pose reminiscent of the original Star Wars: a New Hope movie poster. It will have a Meeple in place of Luke Skywalker, holding aloft of a pencil for a lightsaber on top of a D10 (for easy FFF 3D printing, with a WarHammer 4k reminiscent mini standing in for Leia (which I find completely hilarious). Throw in a Catan tile and a few pawns and makers of my own design for C3PO and R2-D2 on the back.

I want to make this official. That is to say I hope I can have your endorsement. I plan to do the modeling on livestream on Thursday the 16th. After the modeling is complete I hope you'll give me permission to share the 3D model with the world. I am making myself available to you, and I hope to hear from you on this project of love. Love for what you do.

Saturday, January 28, 2017

2017 Year of the Rooster 3D Printed in Algix Dura Video

Code for 3D Scholars: J:LUVLXJ PJ LUVMJ

Technically this is a day late. While January 28th is Chinese New Year, just like the New Year I'm most acquainted with, the day itself is pretty much secondary to the day before and the countdown at midnight. So apologies to all my Chinese viewers to not getting this out in time.

Download the Garden Rooster scan here: http://www.thingiverse.com/thing:189558

Find out more about Algix Dura on their web site: algix3d.com


Wednesday, January 25, 2017

3D Printed Dice Dump Day - Giving it away

What a morning. It wasn't easy making these dice, and it wasn't easy uploading them either. Well, it wasn't hard, just tedious. But now it's done, and you can purchase and download any of the varieties on Pinshape:

Giving it away

I want to talk for a second about giving it away. I've come out in the past unapologetically insisting that 3D models should cost money. I still feel that way. However, there's also the side of things where I really just want people to have and use these things. There's enough cost associated with running a 3D printer, in terms of time and to a lesser extend material, that when there's also a cost of the model that people tend to count things up, and the final tally usually comes to "not worth it". I understand that. 

It's one thing when you can download a model for free and leave it sit in my downloads directory until I'm ready to use it or not. I think we all do that. but when I have to put forth actual money, to commit to printing that model, and then I see that bursting downloads directory, that causes me to go "well, maybe I'll hold off until I print a few more of these". Yeah, I get it. If it's in their downloads directory, maybe eventually it will be printed. It would be great if you could pay after printing, but that also just never happens.

Amanda F'n Palmer gave a great Ted talk about how she's had success giving away her work, and I'd like to be like that too.  But I don't have the active audience that she does surrounding her, ready to descend and shoot a music video on a whim. Yet.

This led me to do 3 things:

First, if you're on my pateron you can expect to receive these files right now.

Second, I when I have a series like this I'll give away the best of the series. I figure if I give away less than the best people won't even look at the rest, so I'll be giving away my favorites. Maybe this is just good business, but I don't know anything about that.

Third, if you still want a file I'm selling, all you have to do is ask. I'd love if you'd share the file on Facebook, Twitter, or wherever, but even if you don't, and you contact me and make that personal connection, then I'll hook you up, with rare exception.

I still just want people to enjoy the work I do. Well, not "just". I also want my work to be recognized as worth something and I'd like to be successful if possible. But at this point it feels like I'm putting a price on them out of principal. I don't think I'm going to pay the bills with 3D models, at least not any time soon. So for now if you want them l, and you let me know you want them, I'll get them to you. Contact form is in the side bar.

Looking forward to connecting with you.

Monday, January 23, 2017

3D printed pompom ring

This silly little project was motivated by a twitter conversation between myself, the 3D Printing Noob, and the 3D Pritning Cheerleading Squad of Lauren Renee and Heather of A Pyro Design. When an offhand conversation goes to production in less than a day, I can't really charge for that one. So when I uploaded it it went to PinShape, naturally, but also Thingiverse. I don't upload as much to Thingiverse these days, but this one seemed perfect.

I find this sort of forced failure model to be gimmicky and I worry that in 5 years they will be an interesting footnote in 3D printing's history. Vase printing as well. However, it wasn't difficult to do, and the result is fun. I sometimes get caught up in my own high-mindedness, and so I think it was good to let it go and do something silly. In fact I'm thinking about making a livestream out off this project later this week.

You can download your own PomPom ring on Pinshape or Thingiverse and print it for yourself.

Saturday, January 21, 2017

3D Printed Space Dice Gone Wild

So I might have gone a little bit space dice crazy. I think it's out of my system now. Fortunately, you all get to reap the rewards. What follows is a descent into the madness of my mind via the medium of 3D printed dice, so strap in and enjoy the ride.
After I released my Space Dice models and made the video for them, I got a comment that the dice looked like I was ripping off the companion cube. Of course it has no hearts anywhere and therefore was more ripping off the weighted storage cube. But I can also claim it was completely accidental. When designing a dice and the word "space" is thrown in there it is inevitable to have protruding corners, and I don't know why. Plus it just prints better when you're trying to follow the YHT principles, which I am. Still, it got me thinking. And since there were avenues I wanted to but didn't explore but didn't because I wasn't sure the idea wasn't going to work, now that I know they work, I gave myself license to explore.

The Dice Body types

So here's the 6 body types I came up with.
Prototype: The first body type is the one that I came up with while modeling, but not the first one I released. It's simply a recess in the side so that the numbers didn't protrude. I could have recessed the numbers, but I didn't. I'm glad I didn't because everything that follows came because of this decision. This does vary slightly from the actual prototype dice because the corners are rounded, but I decided to go with it because it prints better. So this is more prototype plus.
Release Version: I realized that I could connect the recesses, isolating the corners, without affecting the magnets and that the result would look cool, so I did. And this was the version of the dice that I released. This was the point that I rounded the corners of the recess the first time, which motivated the next iteration...
Release Plus: While rounding the corners of the recess I wondered if I could also round the corners of the cut, giving the appearance of the inner cube being a rounded one capped with the protruding corners. I knew overhang might cover most of this, but decided not to push it at the time. No reason not to now, so here it is. The only real difference is the significantly rounded edges of the inner dice
Diamond Joe: Thinking about the protruding corners, I wondered if I could just straighten them out, so instead of going around the tip, they could be like a triangle around them. However, my first attempt was lazy, and I couldn't push it too far without Boolean problems, so I ended up with this, a diamond shaped recess. And it's pretty cool and gives a nice space.
Triangle Corners: But then I stopped being lazy, fixed the diamonds so they connected, and got the straight corners I wanted in the first place. The difference between this and Diamond Joe is subtle, but I feel significant to the feel. Diamond Joe is a recessed diamond hole, Triangle Corners is protruding diamond corners. It all depends on who connects I guess.
Gears: Lastly, gears. Because who doesn't love gears?

This was actually motivated because of an inner monologue after the pips discussion that I'll talk about below. Suffice it to say getting gears on the protruding corners was not easy. This went through many iterations with the teeth lining up at first, then me realizing that's madness, so I rotated half the gears so the teeth would mesh, and them making them mesh, and then realizing that they were invading into the number's space too much and so I backed them off again. I think the gear dice are probably the coolest ones and I wish I could make them just mesh but I'd have to redesign all the numbers to make that happen. Not saying I won't make that happen, just that I'd need to.

So there's the 6 body type variations I came up with, some of them only subtly different from others, but enough that I can call them unique.

The Numbering Types

I also got the comment that the Arabic numerals on the dice were not the best, since 6 and 9 look like each other (even though 9 doesn't appear on a 6 sided dice) and 2 and 5 look like mirrors, especially with this font (...okay, fair), and could I do pips instead? This kicked off the afforementioned inner monologue, that I will detail below as I go through the number options:
Arabic Numerals: Naturally my first number options was the NASA font, because these are space dice after all. But as mention, concerns were raised about the shortcomings of Arabic numerials, and so the traditional pips were requested.

Pips: Really? Pips? That's fine for a 6 sided dice, or maybe as many as 10, but as a numbering system pips are just the worst. I mean what are you going to do when you're trying to represent the square root of 8649, throw a bunch of dots on a piece of paper? I don't think so. And don't think that you can solve the problems with place settings like we do with Arabic numerals. The closes solution I can think of is to do things like they do in grade school with a connected grouping of 10 in a row for 10s and a block of 100 for hundreds, but that doesn't solve the problem of eating up more space, just makes them faster to count. No, pips are the worst.

I propose something a bit more radical.
Intergalactic Numerals: What you see is my contribution to the question of what to do if you make first contact. See, the problem of communicating with an alien life form is that you need a communication system that is visually clear, assuming they have some ability to discern your primitive scratching on their containment wall, but that's a whole other problem. Still, a visually clear works easily enough for nouns, but verbs and numbers are abstract and a little more tricky. I'm still working on verbs, but I have a solution for the numbers, and that solution is before you.

Look at it? Do I even need to explain it? Each shape has a number of corners and sides equal to it's value. Period. Brilliant, right? You can see I've solve the questions of 1 and 2, which are tricky, but what about for really big numbers that become indistinguishable from circles? What about zero? I've got that covered. I don't want to go too much into it. Suffice it to say the numbers cut off at 8 or maybe 10 and are then nested inside each other for the places, insuring the shapes never get too complex.

I've got a rather long discussion about this inside me involving bases and conversions, but suffice it to say that in my head this is the superior number system and should be adopted by everyone immediately and anyone who argues is a fool.

Roman Numerals: What's that you say? My intergalactic numbers are too radical for you? You'd rather just stick with what you know? Fine. Here, have a numbering system that is so convoluted up it's own principals that we keep it around only for when we want to seem fancy, because nothing says regal like something nobody can understand. Roman numerals are the numerical equivalent of the emperor's new clothes, except no one is willing to point out the kings dangling exposure, even after all these thousands of years of it's use. That should make you Neo-Luddites happy.

In truth I love Roman Numerals, but it was that indignant "Neo-Luddite" phrase that made me think of steampunk and thus motivated the gears body. See, got there in the end.

The Combinatorics

So with 6 body types and 4 number types there are 24 possible dice combinations. And if I keep doing the with/without supports versions of the files there will be 48 different STLs, which is just madness so the new files all come with supports, you can remove them if you absolutely have to.

In addition, these dice can easily be modified to earth bound versions by simply removing the holes in the corners for the magnets, creating another 24 different possible dice. That's a total of 48 dice that I've created with this project.

The problem

WHAT DO I DO WITH ALL THESE SPACE DICE? 

Making these dice has been a long enough process as is. I've had to:
  1. Model and test the prototypes,
  2. I had to model the parts that will be a part of the combinations,
  3. Boolean all the combinations together and export them one-by-one, 
  4. Check one-by-one to make sure they don't have any manifold problems, 
  5. Fix the manifold problems, 
  6. Make sure they print, 
  7. Discovering that I had messed up the supports and they wouldn't print, 
  8. Fixing the supports for each one of them one-by-one, 
  9. Check again for manifold problems,
  10. Test print a few of them,
  11. Upload them online,
  12. Consider editing the lime guy meme for a silly picture to make a joke for this section.
None of this is too unusual for any given project I'm working on, but this got multiplied by up to 48 in some cases. These are simple, silly little 3D models, it's true, but taken as a whole the project is painfully involved. For the moment I'm burnt out. 

So if it takes me a little while to get all these distributed, I apologize in advance. And if you're reading this because I linked to it when I uploaded them to explain the combinations, then thank goodness, I survived the dicepocolipse. These dice are now in your hands. I pray you use them well.

I've managed to get them out now. Check out my write-up on that.

Wednesday, January 11, 2017

The surprising necessity of a fan when 3D printing

Left, no fan, right, light fan.
This may come as a shock to you, but there was a time where a downward blowing fan was not standard equipment on most 3D printers. The 3D printing technology at the time, developed by the likes of 3D Systems and Stratasys, never needed one. They were printing ABS in enclosures. And so the reprap based printers, starting from that known system, used ABS and it was known that even a light breeze could destroy an ABS print due to shrinkage. It wasn't until later that the idea of other materials that could benefit from a cooling fan started to be developed.
Even support removal is improved
While printing the models that I modeled in the last video, the print I started in the video had to be canceled because the material I was using needed to be printed at a much higher temperature, I assumed because it had been mislabeled ABS. But after printing it there were still a lot of problems that I started cleaning up. Then it struck me, maybe this wasn't ABS. Maybe it was a high temp PLA (I bought it at a clearance sale, so I can't really be sure all the time). So experimentally I set up my jankey cooling system (because my printer didn't come with one by default).
The different was dramatic. One day I'm gonna get the scratch together to upgrade this old rig, but until then, if you ever wonder why your 3D printer has a cooling fan, this is why:

While every part of the print is greatly improved, even the finish, the effect on the stem is probably the easiest to see in these pictures. It's dramatically amazing.

Wednesday, January 4, 2017

My entry to the Pinshape Space Design contest

This is my entry in the PinShape Space Design contest. You can check it out here. If you have an account on Pinshape (and they're free, so why not?) I hope you'll give it a like there. If you'd like to get the model you you don't need to worry about the exorbitant $0.99 price tag on it. If you're a Pateron backer you'll be getting the models for free. But if you're not all you have to do is share the Pinshape link on social media, then reach out to me and let me know and I'll pass along the free download to you. Easy as that.

I hope everyone enjoys my writeup, too, because I thought I was being terribly clever and I'll probably be using that as the script for the video I'll do showing off this project.

Saturday, December 17, 2016

3D printing new mallets and little hand card holders

This week I did a couple of quick projects this week that went from idea to finished product so fast that I forgot to take any pictures of the process or record anything while I was doing it. Literally from idea to reality in less than a day.

We are living in the future.
My daughter loves playing go fish. The problem is her little 5 year old hands are too small to hold the half the deck she usually ends up with. I've seen a device in the store that will let little hands hold a lot of cards, but those things are too expensive for daddy. But having a 3D printer nothing is impossible.
The first iteration of the design was a little too blocky. Maybe I was too stuck on it being FFFriendly, maybe I was too stuck on the grain of the print not hurting the cards. But it was mostly to test if the gap and flexibility of the part would hold cards. I printed it out and it did indeed hold cards, kinda.
The second iteration I closed the gap and used Blender's curve tool to focus the center to a round point. Then I cut off the edges so it'll still print successfully, and printed it out. And it worked... mostly. Good enough for a little girl, anyways.

Next, my son had a band concert. He's in precussion and plays the bells. He had somehow lost the top of one of his mallets and I suggested that I could print him a new one. I told him I had some flexable material and he said "but dad, it's made with hard plastic". "Oh, well what do you think I normally print with?" and his eyes widened in realization. but of course I didn't wand to just do boring old mallets. So I took my Spelunky designs, took some measurements, and whipped these out.

The important part of the design was having a rounded back, so the design had to be slightly modified, but it wasn't too bad. hopefully they won't be too much trouble to keep upright so that they strike the bells on the rounded part.
They were both printed with 5 shells and 60% infill, so they're practically solid. The skull was printed in ABS in 2 parts, acetone glued together, then vapor smoothed. The idol was printed in PLA in one part, sanded, and hit with a heat gun to melt it slightly. I'm curious if they'll have different sound qualities, but I suspect they're good enough for intermediate school. I wonder what his teacher will think of them. I suspect I kinda over achieved on this one, but it was a lot of fun and a good use of those Spelunky models I made a while back.

Saturday, December 3, 2016

Are you getting in on the 3D Block Zoo?

It started when the better half of A Pyro Design, Heather, did her first 3D modeling in Tinkercad, a simple bunny that started as a default cube, followed later by a swan.

Then SparkyFace5 on Twitter made her own animals and took to YouTube to put out a call to action and, boy, has it taken off.

Thing is making an animal for the 3D Block Zoo movement is super fun and easy. Just fire-up TinkerCad, drag in a default cube, and you're going. You could do it in more complicated modeling programs, i guess, but if you're speding more than 30 minutes on your animal you're doing it wrong (in my humble opinion). I've done a whale and chameleon, and my sons have contributed an elephant and dragacorn, which is exactly what it sounds like. And in printing their models my sons learned about supports and how to design for 3D printing. I couldn't be more thrilled. They're now going back and iterating their designs to make them less reliant on supports!
Seeing how successful my kids were at it I think in the future if someone asks how to start modeling for 3D printing, I'm actually going to recommend to take a standard cube and decorate it like their favorite animal and see what happens.

So check out what people have done on Twitter and TinkerCad maybe try out your own.

Wednesday, June 8, 2016

3D Printed Striped Tie Project


What to say about this one? It was a long time coming, a lot of work went into desiging, testing, printing, iterating, final prints, failed prints, and finally a surprising success. Then filming the video and editing it and getting it out to you. All for a project that I expect no one but me will be excited about. There are other 3D printed tie projects out there, but the use of elastic in this one makes it very comfortable to wear, both around the neck and on the body. I really think it turned out well.

I kind of hope this project will be the start of a lot of 3D printed ties for me. I'd like to design some to take more advantage of the geometric capabilities of 3D printing. I'd like to do one with a dragon scale texture, one with a wood carving texture (with holes in it), maybe one that transforms somehow. I think there's a lot of possibilities.

Saturday, January 23, 2016

Introducting the Thingfolio

Naming things apparently isn't one of my strengths. So bear with me as I introduce to you...
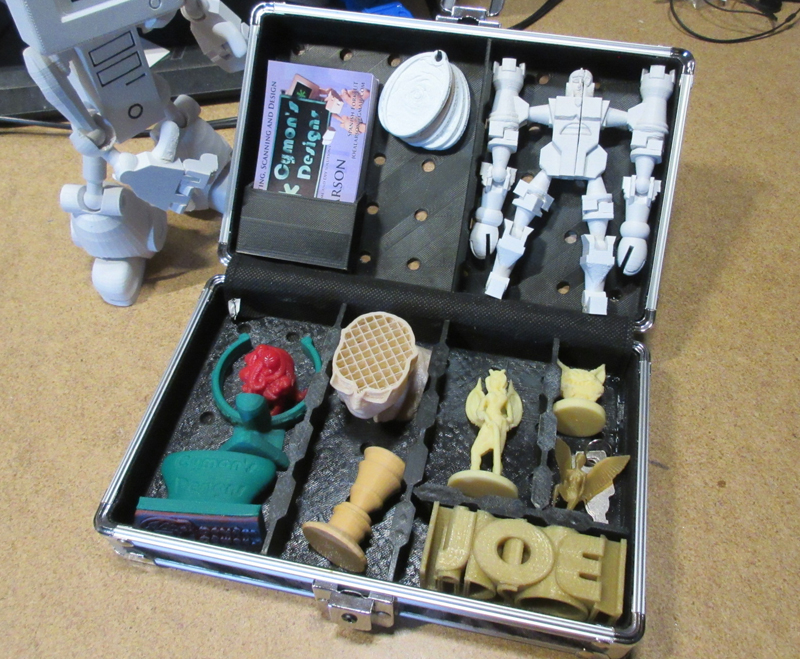
The thingfolio. On the outside is just a fuzzy lunchbox with a zebra stripe pattern and the name of my design company. And on the inside...
there's examples of 3D printing and designs that I can offer including figures, customized products and stamps, and of course the Chessbot. It's an evolving collection. And to really make an impact I include a selection of classic art and flower key chain lithophanes to hand out.
Davinci, Munch, Dicksee and Degas along with a sego lily and rose are all available. Though I keep a few more Mona Lisas on hand since I realize that's what most people will most easily recognize.

Making all these lithophanes taught me a few things. First of all the flowers don't make very good lithophanes. Neither do landscapes. Secondly, despite naysaying to the contrary, very small text is possible with 3D printing, but it must be done vertically and you have to choose your font carefully. In fact I had to basically make the lettering by hand to make this work. But at .1 mm layer heights it's readable.

Barely.

You can downlod your own classic art lithophanes and print them yourself for free.

Thursday, December 17, 2015

TARDIS Run intro video

This has been a long time coming. It involved:
When people say they don't want to share the stuff they've done online, I understand. It's a lot of work. This whole process nuked more than a day for me. But this I put my nose to the grindstone and the result is before you:
In fact I made 2 videos about this one.
I decided to make the new doctors and monsters premium models, in other words I'm asking for a little bit of money for them. I know that will annoy some people. To those people I say I'm sorry. I'm so, so sorry.

I also decided to break my abstinence with Thingiverse, to see if really I'm the only person I'm hurting. So I'll let the Thingiverse community have the updated game and see if it turns to my benefit or not.

Did you notice the new intros and outros with the videos? I'm planning on stepping it up in 2016. No more crappy one-take videos thrown out there with excuses about not having time for editing. I might not get as many videos out, but they'll be much better. So look forward to that in the coming year.

Tuesday, December 8, 2015

When you can't find the right size, make it

Framing pictures is a pain, especially when the frame is too thin or the picture is too thick and you just can't find the right size of clips at the hobby store.

Oh, wait. I can make anything I want, any size I want.

Viola. The colors are off because I did them in 2 batches, one to be sure I got the measurements right, and another to get the quantity right. But who cares about the colors. Nobody's going to see them.

One might rightly question if these are as sturdy as the metal clips. After all, even with 100% infill and vapor smoothed surely these can't last last long as the metal clips? Maybe not. But being plastic they'll probably outlast the frame. And they seem to be holding so far.

Friday, October 9, 2015

Universal Phone and Tablet Car Mount

Like every project this one stemmed from a need I had. I had taken to using my tablet to read me the scriptures and then to listen to podcasts on my commute. But having my phone sit next to me meant that occasionally my eyes left the road, and that's not safe. So I wanted to figture out a way to mount my tablet to my car's dash. At first I was trying to capture the exact shape of my dash and use it's ridges, but then while shopping Deal Extreme I saw a univeral phone mount that clipped into the air vent and realized that was a better way..

It works great, holds my tablet just above the radio and allows me to start the next page or recording without taking my eyes off the road.
 I printed the first iteration in blue PLA and discovered that it worked great the first day, then not at all the second when the sun softened it and loosed the connection. So I printed the warped parts in Orange ABS and they've been working well for over a month now. ABS or other plastics with similar temperature requirements is the way to go on this project.

For the cable I didn't wan a lot of dangling excess, so I got a pair of $1 headphones and spliced them end to end to make a cable just the right length. It turns out cheap headphones have some strange wires that are a combination of copper and cotton, so soldering them is a pain, but I gave it a shot and they seem to work most of the time.

I've also resized and tested the clips for phones, but I haven't got any pictures. but trust me, I have people who have been using this for over a month as well with their phone.

I've made the files for this project available to download online if you'd like your own.

Friday, August 21, 2015

Leapfrog FridgePhonics Replacement Letters

We've got one of those refrigerator toys that takes up a lot space and that the kids delight in playing with at full volume when mommy and daddy are making dinner. Our set is somewhat incomplete.

I always planned on doing this project once I had a scanner. I didn't need to, I could have just taken measurements. But it was more involved than just the shape of it, so the scanner was a good excuse. I needed to find out the combinations of switches for each letter, and make a piece for each letter to match. There were, of course, a few that I had, but figuring out the gaps were the challenge. They do progress in a logical manner once you can see it.

I made mine with a wider contact for the switches, as well as a bigger gap on the side, so that even with printing errors it'll still work in all cases, and so I didn't have to be as careful in the measuring. I also put a recess in a back for a magnet which I have several of for projects like this.

If you've got one of these toys or know someone who does you can download and print them out at:

https://www.youmagine.com/designs/leapfrog-fridgephonics-replacement-letters
https://pinshape.com/items/8113-3d-printed-leapfrog-fridgephonics-replacement-letters
http://3dsha.re/product/leapfrog-fridgephonics-replacement/
https://cults3d.com/en/game/leapfrog-fridgephonics-replacement-letters

Tuesday, July 14, 2015

3D printed L Bracket Drawer Repair

The particle board behind my daughters drawer did what particle board does over time. So instead of running to the store to get some L brackets to fix it I decided to try 3D printing them. Learning from last time I decided to search Yeggi first. Couldn't find exactly what I wanted, though I did find an interesting project, so I went ahead with modeling it myself. Took all of 15 minutes. Then  printed them in ABS, 100% infill, vapor smoothed, and installed. And they worked.
Mostly. Okay, so the left side brackets cracked because I screwed them too much, but they're still holding well, so I'm goign to go with it. Clearly 3D printed brackets aren't flawless, but they're good enough and holding for now. And if they fail I can always print some new ones.

Or just run to the hardware store this time.